Delivery Settings
How to configure settings for delivery services:
General Settings:
- From the dashboard, click the Settings button at the left hand side of the screen.

- Under the Services tab, click Deliveries.
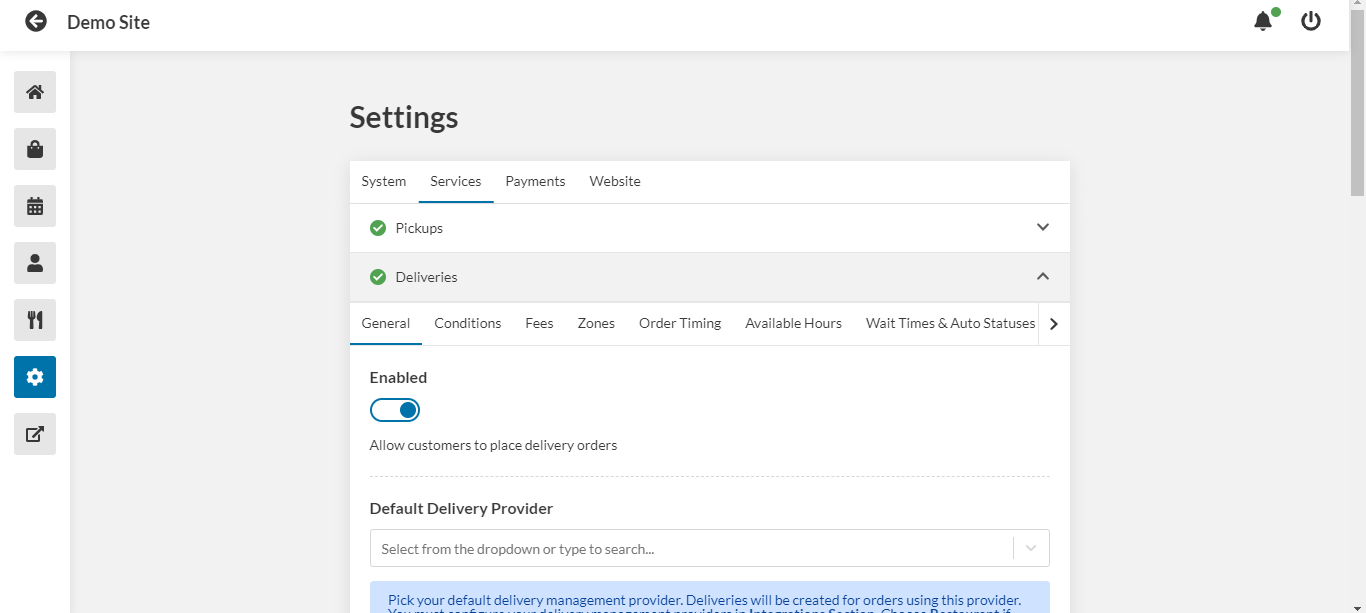
- Toggle delivery services on or off.
- Select your default delivery provider from the drop-down menu.
- Enter any notes to display to customers if they select delivery service.
- Use the drop-down menu to restrict delivery service to a certain country.
- Use the toggle if you want to avoid tolls on the delivery route.
- Use the toggle if you want to avoid highways on the delivery route.
- Enter any delivery addresses that you want to block, each on a separate line.
- Use the toggle to force users to enter an address with a street number.
- Use the toggle to force users to enter a valid street address, not a location or the name of a business.
- Click Save.
Conditions Settings:
- Under Deliveries, go to the Conditions tab.
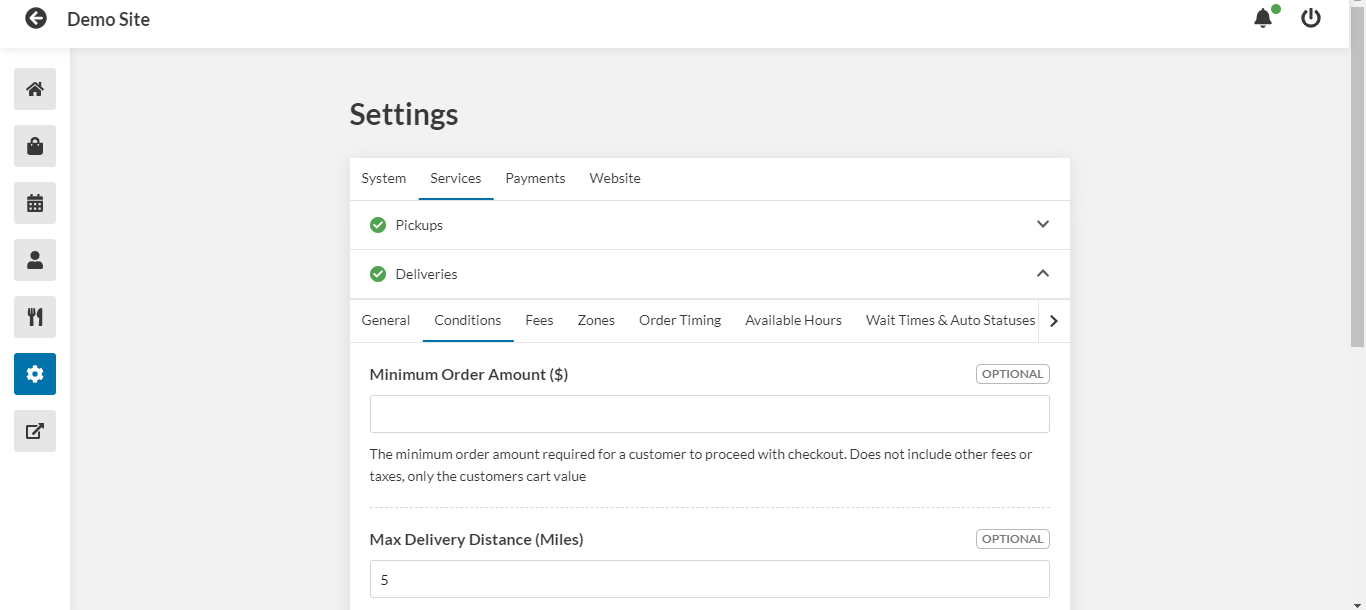
- Enter a minimum order amount.
- Enter the maximum delivery distance from the restaurant.
- Enter the maximum driving time from the restaurant.
- Click Save. Fees Settings:
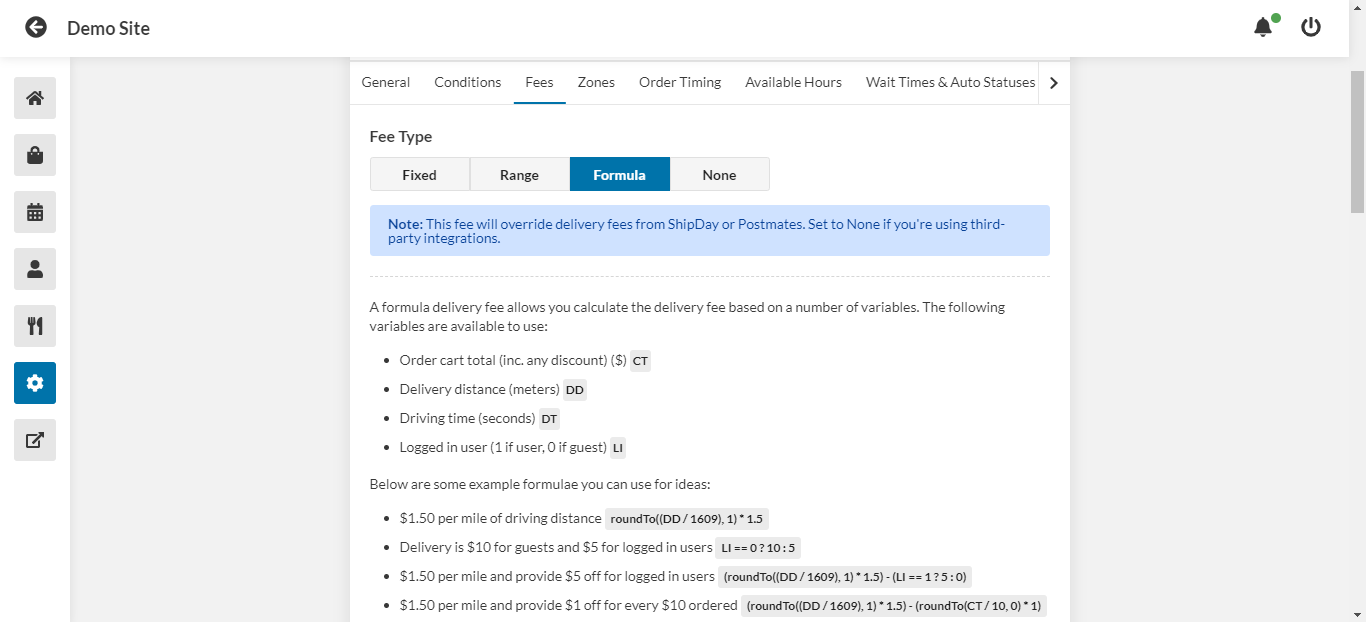
- Under Deliveries, go to the Fees tab.
- Select the fee type. Select Fixed for a fixed-price fee, Range for variable fees based on distance, Formula if you want to write a mathematical expression for calculating the fee, or None. None is recommended if you are using a third-party delivery service as any fees entered here override the fees of that service.
- If you selected Fixed, enter the fixed delivery fee.
- If you selected Range, enter the delivery fee for each distance interval. You can add more distance intervals using the Add button.
- If you selected Formula, enter the formula according to the given variables, operators, and functions. Use the Test Formula field to calculate a hypothetical delivery fee based on a given combination of cart total, delivery distance, driving time, and whether or not the customer is logged in.
- In the Free Delivery Amount field, enter the threshold value for the cart total past which the delivery fee is waived.
- Use the drop down menu to select whether fees will apply to immediate orders, delayed orders, or both.
- Use the toggle to apply taxes to the delivery fee.
- Click Save.
Delivery Zones Settings:
Use delivery zones to ensure delivery orders are accepted only within set areas. Adding delivery zones will override existing delivery fee and max driving distance settings
Visit your custom google maps and login if needed Press the button that says "Create A New Map" Use the draw line tool to create your various delivery zones making sure to give them meaningful names that you can remember Delivery zones must be closed shapes. Do not create any additional layers Use the "Export to KML/KMZ" option and check the box that says "Export to a .KML file". Press download to get your map file and upload it under Settings > Services > Deliveries > Zones.
Order Timing Settings:
- Under Deliveries, go to the Order Timing tab.
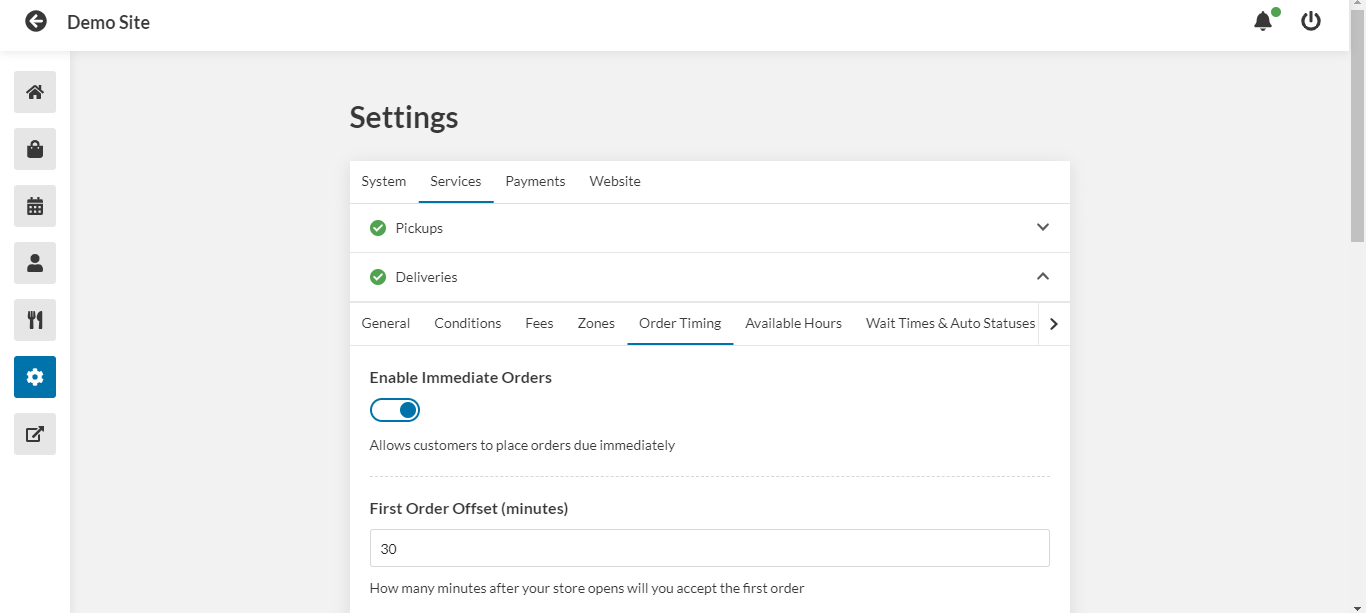
- Use the toggle to enable immediate orders.
- Use the First Order Offset field to enter how many minutes after opening you will begin accepting delivery orders.
- Use the Last Order Offset field to enter how many minutes before close you will stop accepting delivery orders.
- Use the toggle to enable delayed orders.
- Enter the maximum number of days ahead that a customer can place an order.
- Enter the time interval between each available order slot.
- Enter the minimum amount of time from now that a placed order must be delayed until.
- Click Save.
Wait time and auto status settings:
- Under Deliveries, go to the Wait Times & Auto Statuses tab.
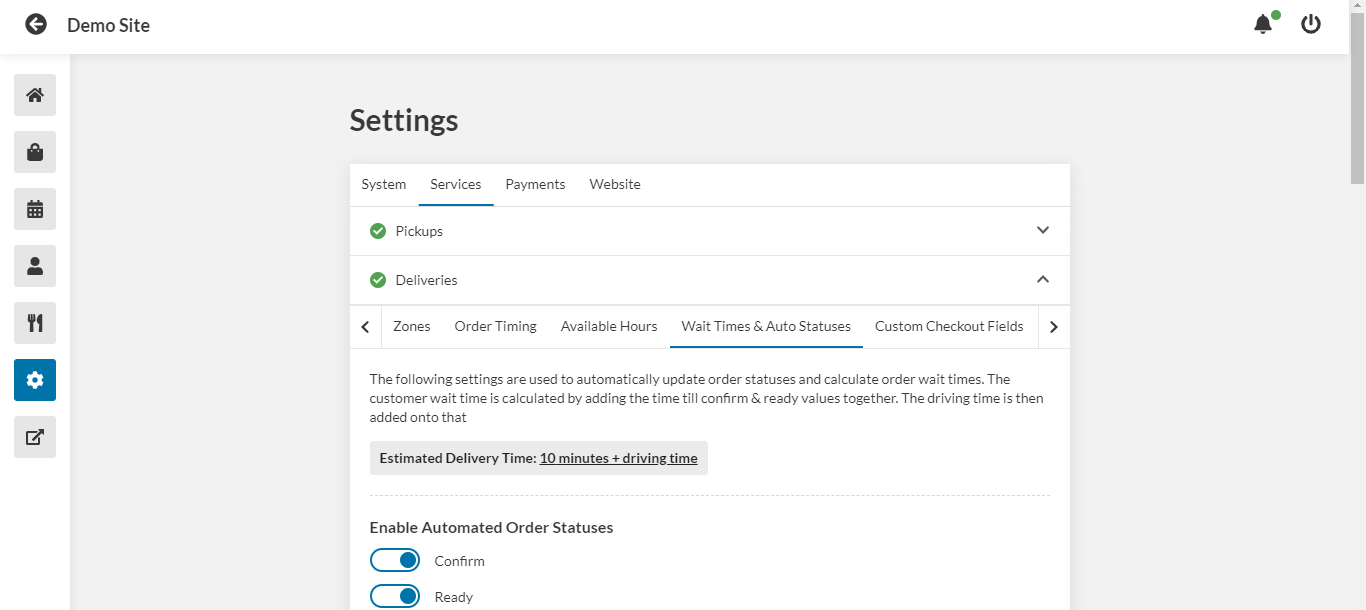
- Use the toggles to enable automatic status updates, sent after a given amount of time since the order has elapsed.
- Enter the amount of time to elapse after an order is placed for an automatic confirm update to be sent.
- Enter the amount of time to elapse between the automatic confirm update and the automatic ready update.
- Enter the amount of time after the order is ready for an on-route update to be sent.
- Enter the amount of time after the order is on-route for a completed update to be sent.
- The total wait time will be the amount of time between the order and the order being on route, as set in the previous steps, plus driving time.
- During busy times, you may want to add extra wait time for each given number of orders in the queue. In the For Every X Outstanding Orders field, enter the number of orders that will add extra wait time. In the Increase Wait Time By Y Minutes field, enter the amount of wait time to add for each number of orders that you entered in the previous field.
- Click Save.
Custom checkout fields settings:
You can add custom fields that will display to the customer at checkout.
- Under Deliveries, go to the Custom Checkout Fields tab.
- Click Add New Field.
- Use the toggle to enable or disable this field.
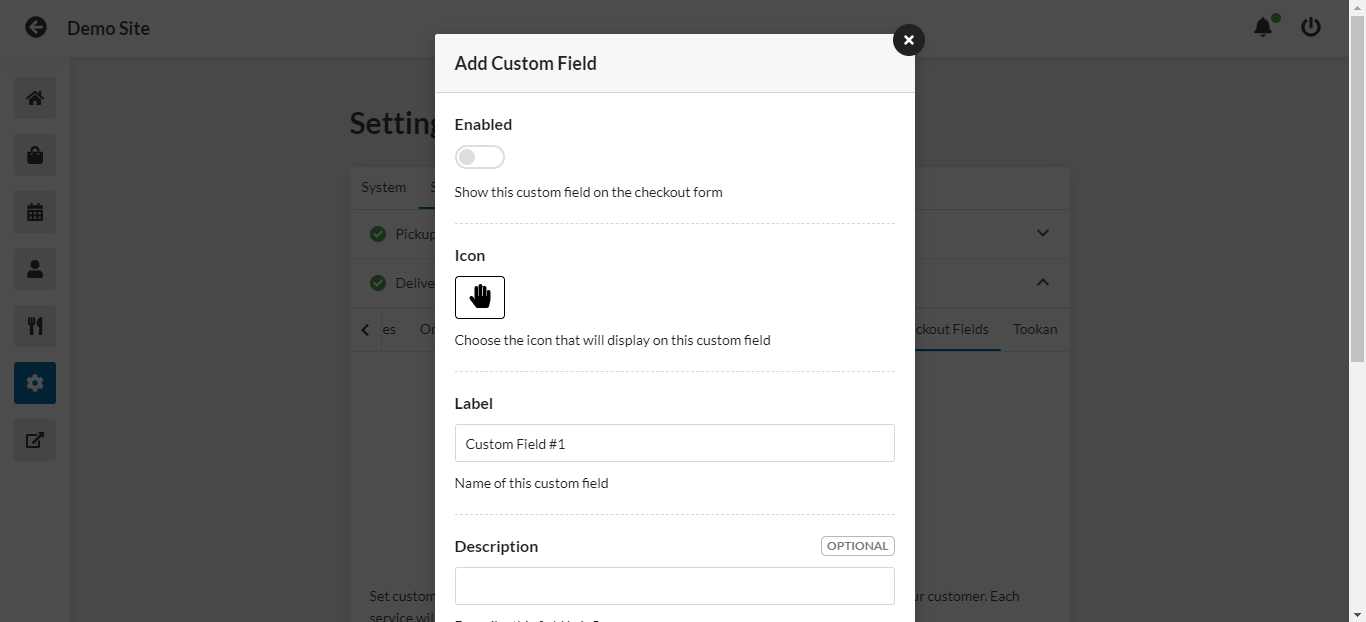
- Choose an icon that will display on this custom field.
- Enter a label for this custom field.
- Enter a description for the field.
- Use the drop-down menu to select the type of field.
- Use the toggle to require the customer to make an input in this field.
- Click Add.
- Click Save.
Tookan settings:
- Under Deliveries, go to the Tookan tab. You may have to click the arrow on the right to show this tab.

- Enter your Tookan API key in the field.
- Enter your Tookan time zone offset.
- Use the toggle if you want to auto-book deliveries with Tookan. Otherwise you will have to manually enter delivery orders.
- Click Save.